About

ေဇာ္ဝင္း (IT)

ကၽြန္ေတာ္ဆိုက္မွနည္းပညာမ်ားမွာဆရာမ်ားထံမွကူးယူေဖာ္ျပထားတဲ့အတြက္မွားတာေလးမ်ားပါရင္ခြင့္လြတ္ေပးပါ၊ေကာင္းတာေလးမ်ားပါ ရင္လဲ တဆင့္ကူယူေဖာ္ျပနိုင္ပါတယ္....

This is default featured slide 2 title

Go to Blogger edit html and find these sentences.Now replace these sentences with your own descriptions.This theme is Bloggerized by Lasantha Bandara - Premiumbloggertemplates.com.

This is default featured slide 3 title

Go to Blogger edit html and find these sentences.Now replace these sentences with your own descriptions.This theme is Bloggerized by Lasantha Bandara - Premiumbloggertemplates.com.

This is default featured slide 4 title

Go to Blogger edit html and find these sentences.Now replace these sentences with your own descriptions.This theme is Bloggerized by Lasantha Bandara - Premiumbloggertemplates.com.

This is default featured slide 5 title

Go to Blogger edit html and find these sentences.Now replace these sentences with your own descriptions.This theme is Bloggerized by Lasantha Bandara - Premiumbloggertemplates.com.

Thursday, March 24, 2016

[Full] Internet Download Manager (IDM) 6.25 Build 14

မဂၤလာပါကြန္ပ်ဴတာမွာ Video,Music,software အစရွိတဲ့အရာမ်ားကို ေဒါင္းလုပ္လုပ္ယူတာမွာ အရင္တုန္းက အေဟာင္းေတြထက္ႏွစ္ဆျမန္လာတဲ့ Internet Download Manager (IDM) 6.25 Build 14အသစ္ထြက္လာလုိ႔ တင္ေပးလုိက္ပါတယ္။InternetDownloadManager ေဆာ့၀ဲလ္ဆုိရင္အေထြထူေၿပာစရာမလုိ႔ပါ
အားလံုးသိျပီးသားထင္တယ္။ေဆာ့၀ဲသြင္းနည္းေလးကို Notepad ထဲမွာေရးထည့္ေပးထားသလို ေဆာ့၀ဲလ္သြင္းရတာလည္းလြယ္ကူပါတယ္။အသစ္ေလးမို႔ေအာက္မွာေဒါင္းယူလိုက္ပါ။ေဆာ့၀ဲလ္အင္စတိုးလုပ္နည္းကို 
ေအာက္မွာvideo ႀကည့္ႏိုင္ပါတယ္။
============= 


Camera360Ultimate7.3.4.apk

 
မဂၤလာပါကြ်န္ေတာ္ ဖုန္းApk  ေတြမတင္တာအေတာ္လည္းႀကာသြားပါျပီ  ဒီေန႕ကြ်န္ေတာ္တင္ေပးလိုက္တာကေတာ့ သူငယ္ခ်င္းတို႔ ဓာတ္ပုံရုိက္ေလ့ရွိသူေတြ အတြက္ ေဆာင္ထားသင့္တဲ့ေဆာ့၀ဲလ္ေလး Camera360Ultimate7.3.4.apk
ေနာက္ဆံုးဗားရွင္းေလးကုိတင္ေပးလုိက္ပါတယ္ Camera360ကိုဖုန္းအသံုးျပဳသူတိုင္းသိတဲ့ေဆာ့၀ဲလ္ေလးျဖစ္ပါတယ္။Camera mode မ်ားထပ္ေပါင္းထားတာေတြ႕ရျပီး။အသစ္မွႀကိဳတ္တဲ့သူငယ္ခ်င္းမ်ားေအာက္လင့္မွာေဒါင္းနုိင္ပါတယ္။ 
=============
 

Thursday, March 17, 2016

Windows 7 Sp1 x86 x64 11in1 en-US March 2016 [ISO]

Windows 7 Sp1 AIO
Windows 7 AIO 11in1 ISO Free Download Latest OEM RTM version. It is Full Bootable ISO image of windows 7 11in1 ISO 32/64 Bit.

Windows 7 SP1 X86 X64 11in1 en-US March 2016 Overview

RELEASE INFO
* File: Windows 7 Sp1 AIO 11in1.iso
* Sources:
* 32bit: X17-59463 & dvd-677710
* 64bit: X17-59465 & dvd-677651
* Size: 4.32 GB
* Format: Bootable ISO
* CRC32: 04a3de1d
* MD5: b83caca2d65c6324e4da6601e45cc177
* SHA-1: 9355c0f2abd47138c303cd76b6360112d76e1760
EDITIONS INCLUDED
* 32bit:
Windows 7 Starter x86
Windows 7 Home Basic x86
Windows 7 HOme premium x86
Windwos 7 Professional x86
Windows 7 Ultimate x86
Windows 7 Enterprises x86
* 64bit:
Windows 7 Home Basic x64
Windows 7 Home Premium x64
Windows 7 Professional x64
Windows 7 Ultimate x64
Windows 7 Enterprises x64
* Including Microsoft updates til 08.03.2016 and Internet Explorer 11
* NO tweaks or add-ons.
* NO additional programs and software added.
* NO graphics, scripts and wallpapers added or changed.
* It’s the original image from Microsoft except added updates and IE11!
Note: Dotnet 4.6.1 and Activators added in desktop , after installing windows install dotnet 4.6.1 and activate windows by given activators
Changes in version 16.3.15
Added KB3138910-x86-x64, KB3139398-x86-x64, KB3139914-x86-x64, KB3140410-x86-x64, KB3140735-x86-x64
Added KB3118401-x86-x64 (replaces the KB2999226-x86-x64)
Added KB3121255-x86-x64 (replaces the KB2928562-x86-x64)
Added KB3135983-x86-x64 (replaces the KB3032655-x86-x64)
Added KB3135988-x86-x64 (replaces the KB3099862-x86-x64)
Added KB3138612-x86-x64 (replaces the KB3135445-x86-x64)
Added KB3138962-x86-x64 (replaces the KB3033890-x86-x64)
Added KB3139852-x86-x64 (replaces the KB3134214-x86-x64)
Added KB3139929-IE11-x86-x64 (replaces the KB3134814-IE11-x86-x64)
Added KB3139940-x86-x64 (replaces the KB3020338-x86-x64)
The following update is not relevant and removed: KB3087039-x86-x64
The following updates are excluded:
• KB971033 -x86-the x64 (Update for Windows Activation Technologies checking)
• KB2952664 -x86-the x64 (System Update compatibility for migration to Windows 10)
• KB2977759 -x86-the x64 (Diagnostics compatibility issues for upgrading to Windows 10)
• KB3021917 -x86-the x64 (diagnostics and telemetry systems to upgrade to Windows 10)
• KB3035583 -x86-the x64 (Update sets “Get Windows 10” application)
• KB3068708 -x86-the x64 (Update to improve the quality of diagnostics and telemetry)
• KB3075249 -x86-the x64 (Update adds a point telemetry consent.exe file)
• KB3080149 -x86-the x64 (Update for CEIP program and diagnostic telemetry)
• KB3081954 -x86-the x64 (Update to improve the working folders and telemetry)
• KB3123862 -x86-the x64 (Opportunity to upgrade to Windows 10)
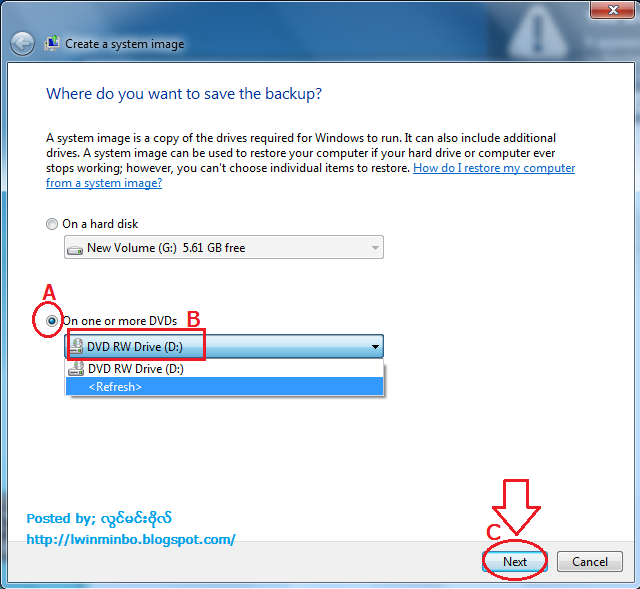
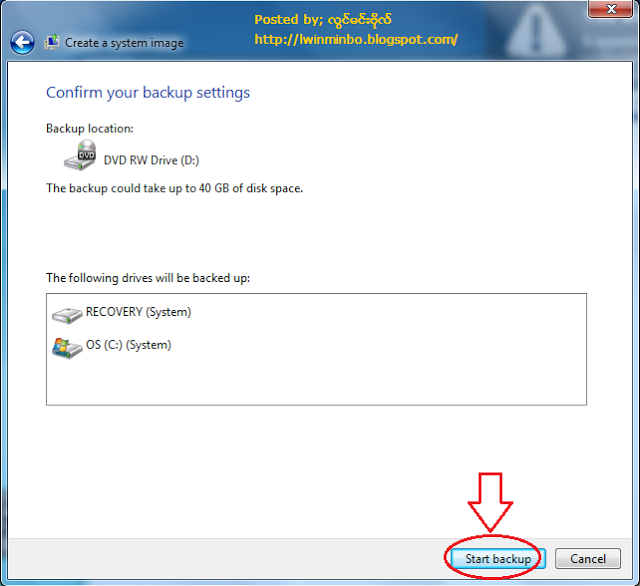
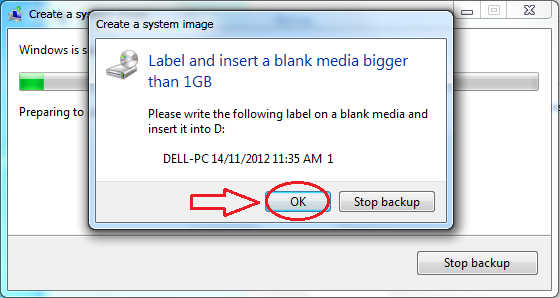
Screenshots
Windows 7 11in1
Windows 7 11in1
Windows 7 11in1
How To Install
* Create bootable USB (highly recommended) with Rufus, or burn to DVD at slow speed.
Title Release: Windows 7 Sp1 x86 x64 11in1 en-US March 2016
Author: Team OS
Language: English
Activation: No, Pre- Activation this month
Updates: Included all new updates of March 2016
Added/Removed: Nothing , its a whole iso with all new Updates of March 2016
Download:
Windows 7 Sp1 x86 x64 11in1 en-US March 2016 ISO (4.32 GB) / Mirror

Wednesday, March 9, 2016

Windows 10 Pro x86 x64 v1511 en-US Feb 2016 [Latest]

 
 Windows 10 ေခြလိုအပ္ေနတဲ့သူငယ္ခ်င္းေတြ Windows 10 Pro x86 x64 v1511 en-US Feb 2016 တင္ေပးလိုက္ပါတယ္။ ဖိုင္း 44 ဖိုင္ခြဲထားပါတယ္။ Download လင့္ကိုေတာ့မူရင္းအတိုင္းသာေပးထားပါတယ္။ေအာက္မွေပါ့ေပါ့ပါးပါးေလး Download ယူလိုက္ပါ။
Download Windows 10 Pro ISO in 100 MB each Part, Free Download Latest OEM RTM version. It is Full Bootable ISO image of Windows 10 Pro ISO 32/64 Bit.
Release Info
* File: WIN10.PRO.X86X64.en-US.Feb2016.iso
* Source: dvd-7223716 & 7223718
* Size: 4.29 GB (100 MB x 44 Parts)
* Format: Bootable ISO
* CRC32: 4aa9090d
* MD5 : 7fc2be4eb1654380bff23f1da0b942ea
* SHA-1: 394841eb0e45daf2a790e89b33321c648156d1fc
* Language: en-US [ USA ]
Contents
* Integrated / Pre-installed:
* KB3136561 (boot.wim)
* KB3135173
* KB3135782
* Setupcomplete / Post-install:
* .NET Framework 3.5
* KB890830
* Defender Updates
Features
• install.wim compressed to recovery format (install.esd)
Editions Included
• 32bit (x86):
* Windows 10 Pro
* Windows 10 Pro – – – – Pre-Activated
• 64bit:
* Windows 10 Pro
* Windows 10 Pro – – – – Pre-Activated
Screenshots:
Windows10PRO1
Instruction:
* Once you have downloaded all parts, Keep it in one folder/place & Extract the 1st Part* with WinRAR
* Download Rufus & Follow the Below tutorial to Create Bootable USB/DVD
* For Video Tutorial Click Here

Title Release: WIN10.PRO.X86.X64.en-US.Feb2016
Language: English US
Activation: Pre Activated
Updates: Included all new updates of Feb 2016
Added/Removed: Nothing , its a whole iso with all new Updates of Feb 2016
File Size: 4.29 GB (100mb x 44 files)
Download:
Windows 10 Pro x86 x64 v1511 en-US Feb 2016 – Part 1 (100 MB)
Windows 10 Pro x86 x64 v1511 en-US Feb 2016 – Part 2 (100 MB)
Windows 10 Pro x86 x64 v1511 en-US Feb 2016 – Part 3 (100 MB)
Windows 10 Pro x86 x64 v1511 en-US Feb 2016 – Part 4 (100 MB)
Windows 10 Pro x86 x64 v1511 en-US Feb 2016 – Part 5 (100 MB)
Windows 10 Pro x86 x64 v1511 en-US Feb 2016 – Part 6 (100 MB)
Windows 10 Pro x86 x64 v1511 en-US Feb 2016 – Part 7 (100 MB)
Windows 10 Pro x86 x64 v1511 en-US Feb 2016 – Part 8 (100 MB)
Windows 10 Pro x86 x64 v1511 en-US Feb 2016 – Part 9 (100 MB)
Windows 10 Pro x86 x64 v1511 en-US Feb 2016 – Part 10 (100 MB)
Windows 10 Pro x86 x64 v1511 en-US Feb 2016 – Part 11 (100 MB)
Windows 10 Pro x86 x64 v1511 en-US Feb 2016 – Part 12 (100 MB)
Windows 10 Pro x86 x64 v1511 en-US Feb 2016 – Part 13 (100 MB)
Windows 10 Pro x86 x64 v1511 en-US Feb 2016 – Part 14 (100 MB)
Windows 10 Pro x86 x64 v1511 en-US Feb 2016 – Part 15 (100 MB)
Windows 10 Pro x86 x64 v1511 en-US Feb 2016 – Part 16 (100 MB)
Windows 10 Pro x86 x64 v1511 en-US Feb 2016 – Part 17 (100 MB)
Windows 10 Pro x86 x64 v1511 en-US Feb 2016 – Part 18 (100 MB)
Windows 10 Pro x86 x64 v1511 en-US Feb 2016 – Part 19 (100 MB)
Windows 10 Pro x86 x64 v1511 en-US Feb 2016 – Part 20 (100 MB)
Windows 10 Pro x86 x64 v1511 en-US Feb 2016 – Part 21 (100 MB)
Windows 10 Pro x86 x64 v1511 en-US Feb 2016 – Part 22 (100 MB)
Windows 10 Pro x86 x64 v1511 en-US Feb 2016 – Part 23 (100 MB)
Windows 10 Pro x86 x64 v1511 en-US Feb 2016 – Part 24 (100 MB)
Windows 10 Pro x86 x64 v1511 en-US Feb 2016 – Part 25 (100 MB)
Windows 10 Pro x86 x64 v1511 en-US Feb 2016 – Part 26 (100 MB)
Windows 10 Pro x86 x64 v1511 en-US Feb 2016 – Part 27 (100 MB)
Windows 10 Pro x86 x64 v1511 en-US Feb 2016 – Part 28 (100 MB)
Windows 10 Pro x86 x64 v1511 en-US Feb 2016 – Part 29 (100 MB)
Windows 10 Pro x86 x64 v1511 en-US Feb 2016 – Part 30 (100 MB)
Windows 10 Pro x86 x64 v1511 en-US Feb 2016 – Part 31 (100 MB)
Windows 10 Pro x86 x64 v1511 en-US Feb 2016 – Part 32 (100 MB)
Windows 10 Pro x86 x64 v1511 en-US Feb 2016 – Part 33 (100 MB)
Windows 10 Pro x86 x64 v1511 en-US Feb 2016 – Part 34 (100 MB)
Windows 10 Pro x86 x64 v1511 en-US Feb 2016 – Part 35 (100 MB)
Windows 10 Pro x86 x64 v1511 en-US Feb 2016 – Part 36 (100 MB)
Windows 10 Pro x86 x64 v1511 en-US Feb 2016 – Part 37 (100 MB)
Windows 10 Pro x86 x64 v1511 en-US Feb 2016 – Part 38 (100 MB)
Windows 10 Pro x86 x64 v1511 en-US Feb 2016 – Part 39 (100 MB)
Windows 10 Pro x86 x64 v1511 en-US Feb 2016 – Part 40 (100 MB)
Windows 10 Pro x86 x64 v1511 en-US Feb 2016 – Part 41 (100 MB)
Windows 10 Pro x86 x64 v1511 en-US Feb 2016 – Part 42 (100 MB)
Windows 10 Pro x86 x64 v1511 en-US Feb 2016 – Part 43 (100 MB)
Windows 10 Pro x86 x64 v1511 en-US Feb 2016 – Part 44 (97 MB)

Tuesday, March 1, 2016

Hard Drive ေတြကို Partition ခြဲလိုေပါင္းလိုသူမ် ားအတြက္ နည္းပညာ

 ကြ်န္ေတာ္ zawwin ယူလာသည့္ ဆိုက္အား   သည္မွာ ေလ့လာႏိုင္ပါတယ္။
Hard Drive ေတြကို Partition ခြဲလိုေပါင္းလိုသူမ် ားအတြက္ နည္းပညာ မွ် ေဝျခင္းျဖစ္ပါတယ္ က်ေနာ့ ဆိုဒ္မွာတင္သမွ် ေတြဟာ ကိုယ္တိုင္လက္ေတြ ့လုပ္ကိုင္ျပီးတင္ထားတာျဖစ္ပါတယ္။ သင့္ အေနနဲ ့ ဒီနည္းကို စတင္ေတာ့မယ္ဆိုရင္ သင့္ကြန္ပ်ဴ တာရဲ့ Start Menu ကို Click ႏွိပ္ျပီး My Computer ေပၚမွာ Right Click ႏွိပ္လိုက္ပါ ဒီအဆင့္အတြက္ပံုကိုေအာက္ပါပံုမွာၾကည့္ပါ။


 ေပၚလာမဲ့ Pop-Up Menu ထဲမွာ Manage ကိုရွာျပီးဖြင့္လိုက္ပါ ဒီအခါမွာ Application Windows ေလးေပၚလာမွာျဖစ္ပါတယ္ ဒီ Windows ရဲ့နာမည္က Computer Management ျဖစ္ပါတယ္။

 အထက္ပါပံုကိုၾကည့္အပါ ဒီ Computer Management ထဲက Disk Management ကို Click တစ္ခ်က္ႏွိပ္ျပီးဖြင့္ပါ ေအာက္ပါပံုအတိုင္း ေပၚလာမွာ ျဖစ္ပါတယ္ 

Disk Management Tool

Windows ေတြရဲ့ Version ေတြမတူတာေၾကာင့္ေပၚလာတဲ့ ပံုေတြမတူလို ့ မ်က္စိလယ္မသြားရေလေအာင္ ေအာက္မွာပံုတစ္ပံုထပ္ တင္ေပးလိုက္ပါတယ္။ 

ဒီပံုထဲမွာေတာ့ Partition က သံုးပိုင္းေတာင္ ပါေနပါတယ္ သင့္ကြန္ပ်ဴ တာထဲမွာေတာ့ ႏွစ္ပိုင္းလဲျဖစ္နိဳင္တယ္ တူေတာ့ မတူဘူးေပါ့ဗ် ာ တူရင္လဲတူမယ္ အေရးၾကီးတာက လုပ္နည္းေလးသာ ျဖစ္ပါတယ္။
ဒီေတာ့ အထက္ပါပံုအရ သင့္အေနနဲ ့Partition (E) ကိုဖ်က္လိုတယ္ဆိုပါစို ့ သင့္ အဲဒီ Partition (E) ေနရာမွာ Right Click ႏွိပ္လိုက္ပါ Pop-Up Menu ေလးက်လာမွာျဖစ္ပါတယ္ ေအာက္ပါပံုအတိုင္းျဖစ္ပါတယ္

Disk Management Menu

ဒီပံုထဲက Delete Partition.. ေနရာကို Click ႏွိပ္ေပးလိုက္ပါ Windows 7 Home မွာၾကေတာ့ Delete Volume.. လို ့ေပးထားလို ့ေအာက္ပါပံုကိုပါတင္ေပးလိုပ္ပါတယ္။ ဒီေတာ့ Delete Partition.. ျဖစ္ျဖစ္ Delete Volume.. ျဖစ္ျဖစ္အတူတူဆိုတာကို သိထားေအာင္ေအာက္ပါပံုကိုတင္ေပးလိုက္ပါတယ္။

ဒီေနရာမွာခုလို Delete ႏွိပ္လိုက္ရင္ ေအာက္ပါပံုေပၚလာမွာျဖစ္ပါတယ္

 ပံုထဲကအတိုင္း OK ကိုႏွိပ္ျပီးဖ်က္လိုက္ပါ။ ဒီလိုဖ်က္လိုက္တဲ့အခါမွာ သင့္ကြန္ပ်ဴ တာမွာ Partition (E) ဟာေျပာက္သြားမွာျဖစ္ပါတယ္ My Computer ထဲဝင္ၾကည့္တဲ့အခါမွာ Partition (E) မရွိေတာ့တာေတြ ့ရမွာျဖစ္ပါတယ္ ဒီေတာ့ ဒီ Partition (E) ကိုျပန္ေဖၚေပးရမွာျဖစ္ပါတယ္ ေအာက္ပါပံုကိုၾကည့္ပါ ဖ်က္လိုပ္တဲ့ Partition (E) ေနရာမွာ Unallocated ေရးျပထားျပီး (E) လို ့ေရးျပထားတာကို မေတြ ့ရေတာ့ပါဘူး ပံုထဲမွာ မ်ဥ္းေစာင္းေတြနဲ ့231GB လို ့ေရးျပထားပါတယ္ ဒါကိုျပန္မေဖၚထားရင္ GB ေတြဆံုးရွံးပါတယ္ ဒီေတာ့ ဒါကိုျပန္ေဖၚေပးဖို ့လိုပါတယ္။ ဒါကိုျပန္ေဖၚရန္ သင္ဖ်က္လိုပ္တဲ့ Partition (E) ေနရာမွာ Right-Click ႏွိပ္ေပးလိုက္ရင္ ေအာက္ပါပံုလိုေတြ ့ရပါမယ္ New Simple Volume ေနရာကို Click ႏွိပ္ေပးလိုက္ပါ။


New Simple Volume ကိုႏွိပ္လိုက္ျပီးရင္ေအာက္ပါပံုမ် ားအဆင့္ဆင့္က် လာမွာျဖစ္ပါတယ္ အားလံုးကို Next မ် ားအဆင့္ဆင့္ႏွိပ္ျပီး Finish ကိုေရာက္တဲ့အထိ Next မ် ားကို ႏွိပ္သြားပါ။


 ဒီေနရာမွာ သူ ့မူရင္း Partition (E) ရဲ့ Volume ျပန္ေပၚလာျပီးျဖင့္လို ့သင့္ရဲ့ လုပ္ေဆာင္မွဳ ေအာင္ျမင္သြားပါျပီ ဒီနည္း Partition ေတြထဲမွာခိုေနေအာင္းေနတဲ့ Virus ေတြမလိုအပ္တဲ့ Software ေတြကို ကိုယ္တိုင္ဘယ္လို ့မွာရွာမရေတာ့တဲ့အခါဖ်က္ျပစ္တဲ့နည္းလဲျဖစ္တယ္ဆိုတာ  မွတ္ထားေစလိုပါတယ္ ကဲ့သင့္ရဲ့ My Computer ကိုဖြင့္ၾကည့္မယ္ဆိုရင္ေတာ့ ေအာက္ပါပံုလို Partition (E) ကိုအသစ္စက္စက္ အျဖင့္ျပန္ေတြ ့ရမွာျဖစ္ပါတယ္။ 


 က်ေနာ္ဟာ မေလးရွာမွာ ကြ်န္ခံလုပ္ကိုင္စားေသာင္ေနထိုင္ေနေပမဲ့ ျမန္မာျပည္ၾကီးကို ခ်စ္တဲ့စိတ္ကေတာ့ ယေန ့နိဳင္ငံေရးသမားေတြထက္ တစ္စက္ေလးမွမေရာ့သြားပါဘူး။ ကို ့ထမင္းကိုစားျပီး ျမန္မာျပည္သူ ေတြကို ပညာမွ်ေဝေနတာ က်ေနာ့ေစတနာအစစ္ေတြေၾကာင့္ ကိုယ္တိုင္လဲ ဥာဏ္စဥ္အျမင့္သို ့သာ တက္လွမ္းပရေစသား။

မိမိတို႔ရဲ႕ Computer ကိုၾကိဳတင္ကာကြယ္ရန္ Windows တစ္ခုလံုးကို DVD xခ်ပ္ေတြနဲ႔ သိမ္းထားရမယ့္ Windows Image Backup File ျပဳလုပ္နည္း


ဒီနည္းေလးကလည္း Windows Recovery အတြက္ အသံုးဝင္တဲ့ နည္းေလးတခုပါပဲ..။ က်ေနာ္တို႔ အရင္တုန္းက Windows Image Backup File လုပ္နည္း ပိုစ့္မွာ ဟတ္ဒစ္ကို Partation တခုခြဲျပီး ၄င္း Partation ထဲမွာ  Image Backup File ကို သိမ္းတဲ့နည္းေလး ေရးေပးခဲ့ပါတယ္.. အဲ့ဒီနည္းနဲ႔လည္း ဝင္းဒိုးအတြက္ အဆင္ေျပသလို အခု ဒီနည္းကလည္း ဝင္းဒိုးအတြက္ အသံုးဝင္တဲ့ နည္းေလးတခုပါပဲ.. တကယ္လို႔ က်ေနာ္တို႔ ဟတ္ဒစ္ထဲမွာ Partation တခုခြဲျပီး သိမ္းထားခဲ့တဲ့ Windows Image Backup File ဟာ Hard Disk ပ်က္စီးသြားရင္ ျပန္လည္ထုတ္ယူလို႔ မရႏိုင္ေတာ့ပါဘူး.. အဲ့လိုအခါမ်ိဳးေတြမွာ ဒီနည္းနဲ႔ ဝင္းဒိုးကို DVD ခ်ပ္ေတြနဲ႔ သိမ္းထားခဲ့မယ္္ဆိုရင္.. Hard Disk ပ်က္သြားလို႔ Hard Disk ေနာက္တခု လဲသံုးတဲ့အခါမွာ ဒီ DVD ခ်ပ္ေတြထဲက မူရင္းအသံုးျပဳခဲ့တဲ့ Original ဝင္းဒိုးကို အလြယ္တကူ Restore ျပန္လုပ္ျပီး ထုတ္သံုးလို႔ ရမယ့္ နည္းလမ္းေကာင္းေလး တခုပါပဲ..။ အဲ့ဒီအတြက္ေတာ့ DVD ေခြသစ္ မ်ားမ်ားလိုအပ္ပါတယ္.. ဘာလို႔လဲဆိုေတာ့ လက္ရွိအသံုးျပဳေနတဲ့ ဝင္းဒိုးေပၚမွာ မူတည္ျပီး ပရိုဂရမ္ေတြမ်ားရင္ မ်ားသလို DVD မ်ားမ်ား လိုအပ္လို႔ပါပဲ.. က်ေနာ္အခု လုပ္ျပထားတဲ့ စက္မွာေတာ့ DVD ၅ခ်ပ္ အသံုးျပဳရပါတယ္..။ အရင္တုန္းက လုပ္ေပးခဲ့တဲ့ စက္မွာေတာ့ DVD ၃ခ်ပ္ ကုန္ပါတယ္.. ဘာလို႔လဲဆိုေတာ့ အခုန ေျပာသလို မိမိတို႔ စက္ထဲမွာ Install ထည့္ထားတဲ့ ပရိုဂရမ္ ေဆာ့ဝဲလ္ေတြေၾကာင့္ စက္တလံုးနဲ႔ တလံုး မတူတာပါ..။ Install ထည့္ထားတဲ့ ပရိုဂရမ္ ေတြေပၚ မူတည္ျပီး DVD မ်ားမ်ား လိုအပ္တာပါ..။ ဒါေၾကာင့္ စက္အသစ္ဝယ္ဝယ္ခ်င္း (သို႔မဟုတ္) ဝင္းဒိုးအသစ္ တင္ျပီးျပီးခ်င္း ဘာေဆာ့ဝဲလ္မွာ Install မထည့္ရေသးတဲ့ အခ်ိန္မ်ိဳးမွာ ဒီလို DVD နဲ႔ ဝင္းဒိုး Backup File လုပ္ထားရင္ ပိုေကာင္းပါတယ္.. အဲ့လိုဆိုရင္ DVD ေခြလည္း ၃ခ်ပ္ေလာက္ပဲ ကုန္ပါလိမ့္မယ္.. အခုဒီပိုစ့္မွာ လုပ္ျပထားတဲ့ ပံုေတြအတြက္ေတာ့ DVD ဘယ္ႏွခ်ပ္ကုန္မလဲဆိုတာ ၾကိဳမသိႏိုင္လို႔ က်ေနာ္ DVD အေခြသစ္ ၁၀ခ်ပ္ကို လိုလိုမယ္မယ္ အဆင္သင့္ ျပင္ဆင္ထားတာပါ.. တကယ္ကုန္တာကေတာ့ ၅ ခ်ပ္ကုန္ပါတယ္.. ပံုေသမမွတ္ပါနဲ႔.. မိမိတို႔စက္မွာ ဒီလိုလုပ္ရင္ေတာ့ ၅ ခ်ပ္ထက္လည္း ပိုရင္ ပုိကုန္ႏိုင္ပါတယ္.. ဒါေၾကာင့္ DVD အေခြသစ္ မ်ားမ်ား စုထားျပီးမွ ဒီနည္းကို လုပ္ၾကပါ.. ဒီနည္းကို အသံုးျပဳဖို႔ ဘာေဆာ့ဝဲလ္မွ မလိုပါဘူး.. ဒီအစီအစဥ္အတြက္ Windows ထဲမွာ ျပဳလုပ္ဖို႔ Tools ေတြပါျပီးသားပါ.. ဒီလုပ္နည္းကို လိုအပ္တဲ့သူမ်ားကေတာ့ ေအာက္မွာပံုေလးေတြနဲ႔ ဆက္ၾကည့္လိုက္ပါဗ်ာ..
 ေကာ္ပီဝင္းဒိုးပဲ ျဖစ္ျဖစ္၊ Original Windows ျဖစ္ျဖစ္ ဒီနည္းကို အသံုးျပဳလို႔ ရပါတယ္..။ အဓိကက ဝင္းဒိုးထဲမွာ Driver ေတြအားလံုး အလုပ္လုပ္ႏိုင္တဲ့အခ်ိန္၊ ျပည့္စံုတဲ့အခ်ိန္မွ ဒီနည္းကို လုပ္ထားပါ..။
DVD ခ်ပ္ေတြနဲ႔ Windows Image Backup File ျပဳလုပ္ဖို႔ ေအာက္ကပံုေလးေတြ အတိုင္း အဆင့္ဆင့္ ျပဳလုပ္ေပးပါ.. အရင္ဆံုး Start ကေနသြားပါ.. ေအာက္ကပံုေလးအတိုင္း နံပါတ္စဥ္တုိင္း ႏွိပ္သြားလိုက္ပါဗ်ာ..


ေနာက္တဆင့္ကို ေရာက္ရင္ေတာ့ A-B အတိုင္း DVD Drive ရွိတဲ့ ေနရာကို ေရြးျပီး Next ႏွိပ္ပါ.. 

ေအာက္ကအဆင့္ကို ေရာက္ရင္ ဝင္းဒိုးက အမွန္ျခစ္ ေရြးေပးထားတဲ့အတိုင္းသာ ထားလိုက္ပါ..။ ဆက္ျပီး Next ႏွိပ္သြားလိုက္ပါ..

 
အေပၚပံုအတိုင္း Start backup ကိုႏွိပ္ေပးလိုက္ရင္ ေအာက္ကပံုအတိုင္း ေပၚလာပါလိမ့္မယ္.. အဲ့ဒီအခ်ိန္မွာ မိမိတို႔စက္ထဲက DVD Drive ကိုဖြင့္ျပီး DVD အသစ္တခ်ပ္ကို အရင္ထည့္ေပးထားပါ.. ဒီနည္းကို လုပ္ေတာ့မယ္ဆုိ ကတည္းက DVD ေခြသစ္ကုိအရင္ထည့္ထားရင္ ပိုေကာင္းပါတယ္.. ေနာက္တခုက DVD ေခြေတြ Burn ျပီးတိုင္း.. အေခြေတြေပၚမွာ တခ်ပ္ Burn ျပီးတိုင္း၊ Burn ျပီးတိုင္း 1-2-3-4-5 အစဥ္လုိက္ ေရးမွတ္ထားဖို႔ အထူးသတိျပဳပါ.. Restore ျပန္လုပ္တ့ဲအခါ အဲ့ဒီ နံပါတ္စဥ္တိုင္း ထည့္ေပးရမွာပါ..။

 ေအာက္ကပုံကေတာ့ ပထမဆံုးစလုပ္တဲ့ အေခြကို နံပါတ္တစ္အျဖစ္ ေရးမွတ္ထားဖို႔ ကြန္ပ်ဴတာ သတိေပးတာပါ..။

DVD ေခြသစ္ကုိ ထည့္ျပီး စကၠန္႔၃၀ ေလာက္ၾကာမွ အေပၚပံုမွာ ျပထားတဲ့ OK ကိုႏွိပ္ပါ.. မိမိတို႔စက္က DVD ေခြ Burn ေနတာကို ၁၀မိနစ္ေက်ာ္ၾကာေအာင္ ေစာင့္ေနေပးျပီးရင္ေတာ့ ေအာက္ကပံုအတိုင္း ေဘာက္စ္တခုေပၚလာရင္ DVD ေခြကို ေနာက္တခ်ပ္ လဲထည့္ေပးလိုက္ပါ.. အဲ့လိုလဲထည့္ေပးဖို႔ Desktop မွ Computer ကိုဖြင့္ထားျပီး ေအာက္ကပံု မွ်ားျပထားတဲ့အတိုင္း  DVD Drive ကို တခ်က္ကလစ္ျပီး Eject ကိုဆက္ႏွိပ္လိုက္ရင္ ကြန္ပ်ဴတာက  DVD Drive ကိုထုတ္ေပးပါလိမ့္မယ္.. အဲ့လိုထုတ္ေပးမွ DVD ေခြသစ္တခ်ပ္ကို လဲထည့္ေပးပါ..

ေအာက္ကပံုကေတာ့ ဘားတန္းက Eject ကိုမႏွိပ္ပဲ DVD Drive ေပၚမွာ Right Click ေထာက္ျပီး ေပၚလာတဲ့ စာသားထဲက Eject ကိုကလစ္လိုက္ရင္လည္း အတူတူပဲ ကြန္ပ်ဴတာက  DVD Drive ကို ထုတ္ေပးပါတယ္.. 


DVD ေခြသစ္မထည့္ ရေသးပဲ OK မႏွိပ္မိဖို႔ သတိျပဳပါ.. ေအာက္ကပံုကေတာ့ DVD သံုးခ်ပ္ေျမာက္ကို ထည့္ျပီး အဲ့ဒီအေခြေပၚမွာ မိမိတို႔ သေကၤတနဲ႔ သံုးခုေျမာက္ဆိုတာကို မွတ္မိေအာင္ ေရးမွတ္ထားပါလို႔ ဆိုလိုတာပါ.. ၂ ခ်ပ္ေျမာက္အေခြက ျပီးသြားပါျပီ.. ေအာက္မွာျပထားတဲ့ပံုက ၃ခ်ပ္ေျမာက္ေခြကို Burn ဖို႔ ေပၚလာတဲ့စာသားပါ..။

အေခြသစ္လဲထည့္ေပးျပီး အနည္းငယ္ေစာင့္ေနျပီးမွ ေအာက္မွာျပထားတဲ့ ပံုအတုိင္း OK ကိုႏွိပ္ေပးပါ.. ဘာလို႔ေစာင္းခိုင္းတာလဲဆိုေတာ့ ကြန္ပ်ဴတာအတြက္ အေခြသစ္ကို ေနရာခ် ျပင္ဆင္ဖို႔အတြက္ စကၠန္႔ပိုင္းေလာက္ အခ်ိန္ေပး၊ ေစာင့္ေပးျပီး ကြန္ပ်ဴတာက အေခြ Burn ဖို႔ အဆင္သင့္ ျဖစ္ေလာက္ျပီဆိုမွ OK ပ္ေပးလိုက္ရင္ ကြန္ပ်ဴတာအတြက္ အဆင္ေျပေျပ အလုပ္လုပ္လို႔ ရေအာင္လို႔ပါ..။

ေအာက္ကပံုေတြတိုင္း အလုပ္လုပ္ေနပါလိမ့္မယ္.. ေစာင့္ေနေပးပါ..


ေအာက္ကပံုအတိုင္း ထပ္ေပၚလာရင္ေတာ့ DVD ေနာက္တခ်ပ္ကို အေပၚကနည္းအတိုင္း ထပ္လဲထည့္ေပးလိုက္ပါ.. DVD လဲထည့္ျပီးမွ ေအာက္ကပံုမွာ ျပထားတဲ့ OK ကိုဆက္ႏွိပ္ေပးပါ.. ေအာက္ကပံုမွာ ၄ ခ်ပ္ေျမာက္ျဖစ္သြားပါျပီ..

 ေအာက္ကပံုကေတာ့ ေနာက္ဆံုးတခ်ပ္ကို Burn ေနတာပါ..။ Burn လို႔ျပီးသြားရင္ေတာ့ ေအာက္ဆံုးပံုအတိုင္း ေပၚလာပါလိမ့္မယ္..


 ဝင္းဒိုးတခုလံုးကို DVD ေတြနဲ႔ Burn ျပီးလို႔ရွိရင္ေတာ့ ေအာက္ကပံုအတိုင္း ဆက္ေပၚလာပါလိမ့္မယ္.. အဲ့ဒါကေတာ့ System Repair Disc ဆက္လုပ္ထားဖို႔ ကြန္ပ်ဴတာက သတိေပး တိုက္တြန္းတဲ့ စာသားေဘာက္စ္ပါပဲ.. ဒီေနရာမွာ System Repair Disc မလုပ္ရေသးတဲ့ သူမ်ားကေတာ့ CD ပဲျဖစ္ျဖစ္၊ DVD နဲ႔ပဲျဖစ္ျဖစ္ ထဲထည့္ျပီး တခါတည္း ဆက္လုပ္ထားလိုက္ပါ.. ဒီ System Repair Disc က ဝင္းဒိုးေတြအတြက္ အေရးၾကီးပါတယ္.. အရင္ ဝင္းဒိုး Recovery ပိုစ့္ေတြမွာကတည္းက  System Repair Disc လုပ္ထားဖို႔ အျမဲသတိေပးခဲ့ပါတယ္..။ လုပ္မယ့္သူမ်ားကေတာ့ Yes ကိုႏွိပ္ျပီး ဆက္လုပ္ပါ.. System Repair Disc လုပ္တာ အေခြထည့္ျပီး Yes >> OK ေပးလိုက္ယံုပဲ.. လုပ္ရတာ လြယ္တဲ့အတြက္ ပံုေတြနဲ႔ မျပေပးေတာ့ပါဘူး.. 

 ဝင္းဒိုးတခုလံုးကို DVD ခ်ပ္ေတြနဲ႔ Windows Image Backup File ျပဳလုပ္နည္း ဒီမွာတင္ျပီးသြားပါျပီ..  (ဒီအေခြေတြကို ဗူးေလးတခုနဲ႔ မပ်က္စီးေအာင္ ေသခ်ာဂရုတစိုက္ သိမ္းထားဖို႔ေတာ့ လိုအပ္ပါတယ္..) သိမ္းထားျပီးသား DVD ခ်ပ္ေတြထဲက Windows Image Backup File ျပန္ထည့္နည္းကို ေနာက္ပိုင္း ပိုစ့္တင္ေပးပါမည္.. အားလံုးပဲ လုပ္တတ္ကိုင္တတ္၍ နည္းပညာ၊ အတတ္ပညာမ်ား တိုးတက္ျပီး မသိေသး၊ မတတ္ေသးတဲ့ သူငယ္ခ်င္း ညီအစ္ကိုေမာင္ႏွမမ်ားအား ျပန္လည္မွ်ေဝ၊ သင္ၾကားေပးႏိုင္ၾကပါေစ.. 
 home http://thesupernaturalmyanmar.blogspot.com/p/76.html

Windows 7 မွာျဖစ္တပ္တဲ့ This Copy Of Windows is Not Genuine ကိုေျဖရွင္းနည္း

windows 7 is not genuine  
 က်ေနာ့ မိတ္ေဆြ Blogger တစ္ေယာက္ရဲ့ PC မွာ အထက္က ပံုအတိုင္း ေရးထားတဲ့ ေရစာအမွတ္ေလးေပၚလာပါတယ္ ဒီေရစာေလး ဟာ Copy Windows ေတြသံုးထားျပီး Internet သံုးတဲ့ မ် ားတဲ့ PC နဲ ့ Laptop မ် ားမွာသာ အျဖစ္မ် ားပါတယ္

Windows 7
Build 7600
This Copy Of Windows Is Not Genuine 


ဆိုတဲ့ ေရစာေလး Microsoft ကကပ္ေပးလိုက္တာ လစဥ္နည္းပါးျဖစ္ေနတယ္ ျပီခဲ့တဲ့ လက သူ ့PC ကို Windows ျပန္တင္ေပးတာ တစ္လ တစ္ၾကိမ္ႏွံဳ းေလာက္ၾကေနေတာ့ ဒီတစ္ေခါက္ Windows ျပန္မတင္ေပးေတာ့ ဘဲ အဲဒီေရစာေလးကို ဖ်က္တဲ့ နည္းေလးရွာ ျပီး စမ္းလိုက္တာ ေအာင္ျမင္သြားတာေၾကာင့္ ဒီအေၾကာင္းကို Post အျဖစ္တင္ေပးလိုက္ပါတယ္ဗ် ာ။  ဒီနည္းကိုသံုးဘို ့အတြက္ ေအာက္မွာရွင္းျပေပးထားတာေလးေတြကိုသာ ေသခ် ာ
ဖတ္ျပီးလိုက္လုပ္ေပးသြား ရံုသာျဖစ္ပါတယ္ အားလံုးအဆင့္ ငါးဆင့္ေပးထားပါတယ္။
ဒီနည္းကို စလုပ္ေတာ့မယ္ဆိုရင္ 

Step 1
ပထမအဆင့္အေနနဲ ့ CMD ဆိုတဲ ့ Command Prompt ကိုေခၚယူရမွာျဖစ္ပါတယ္ ဒီလိုေခၚယူဘို ့ရန္ Start Menu ကိုသြားျပီး Search ထဲကေန CMD လို ့ရိုက္သြင္းပါ ဒီအခါမွာေအာက္ပါပံုထဲကလို cmd သို ့မဟုပ္ cmd.exe ဆိုတာကိုေတြ ့ရပါမယ္။ အဲဒီ CMD အေပၚမွာ Right Click ႏွိ္ပ္ေပးလိုက္ပါ ေအာက္ကပံုကိုၾကည့္ပါ CMD ေနရာကို မွ် ားအနီနဲ ့ျပေပးထားပါတယ္။

Start Menu

ဒီအခါမွာ Pop-Up Dialog Box ေလးကပ္ျပီးေပၚလာမွာျဖစ္ပါတယ္ ဒီ Dialog Box ထဲကိုၾကည့္ပါ Run as administrator ဆိုတဲ့စာကိုေတြ ့ရမွာျဖစ္ပါတယ္ ဒီေနရာကိုေတာ့ မွ် ား အနက္ေရာင္နဲ ့ျပေပးထားပါတယ္ ကလစ္ႏွိပ္ျပီးဖြင့္ေပးပါ။ ဒီအခါမွာေတာ့ ေအာက္ကပံုထဲကလို CMD Command Prompt ပြင့္လာမွာျဖစ္ပါတယ္ ေအာက္ပါပံုကိုၾကည့္ ပါ။ 

windows 7 is not genuine

Step 2
ဒုတိယ အဆင့္အေနနဲ ့ အဲဒီ CMD Box ထဲမွာ SLMGR -REARM ဆိုတာေလးဘဲ ရိုက္ထဲ့ေပးရမွာျဖစ္ပါတယ္ ဒီလို ရိုက္ထဲ့တဲ့အခါမွာ အေရးၾကီးတာက SLMGR ကိုရိုက္ျပီးရင္ Space တစ္ခ်က္ျခားေပးျပီးမွ -REARM ကိုရိုက္ေပးရမွာျဖစ္ပါတယ္ အထက္ကပံုကိုေသျခာၾကည့္ပါ မ် ဥ္း အနီေရာင္နဲ ့ေသျခာတားျပေပးထားပါတယ္။

Step 3
တတိယ အဆင့္ကေတာ့ SLMGR -REARM ကိုမွန္ေအာင္ရိုက္ထဲ့ေပးျပီးသြားရင္ Keyboard က Enter ကိုေခါက္ေပးလိုက္ရံုပါ။

Step 4
စတုတၳ အဆင့္မွာေတာ့ သင္ SLMGR -REARM ကိုမွန္ေအာင္ရိုက္ထဲ့ေပးလိုက္တယ္ဆိုရင္ သင့္ရဲ့လုပ္ေဆာင္မွဳ ေအာင္ျမင္တာကိုျပေပးတဲ့ ေအာက္ပါပံုကိုေတြ ့ရမွာျဖစ္ပါတယ္

windows 7 is not genuine

Step 5
ပဥၥမ အဆင့္ကေတာ့ သင့္ရဲ့ PC သို ့မဟုပ္ Laptop ကို Restart ျပန္ခ်ေပးလိုက္ရံုေလးပါဘဲ အထက္က ပံုမွာလဲ သင့္စက္ ကို Restart လုပ္ဖို ့ေရးေပးထားပါတယ္ ဒီေတာ့ OK ေပးျပီးထြက္လိုက္ပါ ဒီေနရမွာ တစ္ခုသတိထားရမွာကေတာ့ CMD Command Prompt ထဲမွာ EXIT လို ့ရိုက္ေပးျပီး Enter ေခါက္ျပီး ျပန္ပိတ္ေပးလိုက္ပါ ျပီးမွ သာ Restart ျပန္ခ်ေပးလိုက္ပါ။

ကဲ က်ေနာ့ ဆိုဒ္ ထဲ မ်က္စိလည္လမ္းမွားျပီး ေရာက္လာၾကေသာ မိတ္ေဆြမ် ား က်ေနာ့ စာအေရးသားကိုနားမလည္လို ့ ရွိရင္ ေအာက္ပါ Video ေလးကိုလဲ ေလ့လာၾကပါ ျပီးရင္ သူ ့မူရင္း Link ကိုလဲ ထဲ့ေပးထားလိုက္ပါတယ္ဗ် ာ။
home  http://thesupernaturalmyanmar.blogspot.com/2015/02/windows-7-this-copy-of-windows-is-not.html#more

Saturday, February 27, 2016

ကမာၻ့႔ ေတြးေခၚပညာရွင္မ်ား ရဲ့ ဒႆ န တိုေလးမ်ား


I would prefer even to fail with honor than to win by cheating.
Sophocles (496 BC-406 BC)

ကလိမ္ကက်စ္လုပ္ၿပီး အႏိုင္ယူရတာထက္ သိကၡာ ရွိရွိ အရႈံးေပးရတာကို ပိုႀကိဳက္တယ္။

(ဆိုဖေကာ္လ္စ္)


To know what you prefer, instead of humbly saying Amen to what the world tells you . you ought to prefer, is to have kept your soul alive. Robert Louis Stevenson (1850-1894)

သူမ်ားက ႀကိဳက္သင့္တယ္ေျပာလို႔ လိုက္ၿပီးႀကိဳက္လိုက္ရတာမ်ိဳး မဟုတ္ပဲနဲ႔ ကိုယ္ကိုယ္တိုင္ ဘာႀကိဳက္တယ္ ဆိုတာကို သိျခင္းဟာ ကိုယ့္ စိတ္ကို ရွင္သန္ တက္ႂကြလာေအာင္ လုပ္ေပးျခင္းပဲ။ (ေရာဘတ္လူး၀စ္စတီဗင္ဆန္)
 

Every man has his follies - and often they are the most interesting thing he has got. (Josh Billings)

လူတိုင္းမွာ မိုက္မဲမႈေလးေတြ ကိုယ္စီရွိၾကပါတယ္၊ အဲဒီ မိုက္မဲမႈေလးေတြဟာ သူတို႔ ပိုင္ဆိုင္တဲ့ အရာေတြထဲမွာ စိတ္၀င္စားစရာ အေကာင္းဆံုးပဲ။ (ဂ်ိဳရွ္ ဘင္လင္းစ္)


Reading makes a full man; conference a ready man; and writing an exact man. (Francis Bacon (1561-1626)

စာဖတ္ျခင္းေၾကာင့္ (အသိဉာဏ္) ျပည့္စံုသူ ျဖစ္ရသည္၊ ေဆြးေႏြးျခင္းေၾကာင့္ အဆင္သင့္ ေဆာင္ရြက္ႏိုင္သူ ျဖစ္ရသည္၊ စာေရးျခင္းေၾကာင့္ (အခ်က္ အလက္) တိက်သူ ျဖစ္ရသည္။ (ဖရန္႔စစ္ ေဘကြန္)


  It is a farce to call any being virtuous whose virtues do not result from the exercise of its own reason. Mary Shelley (1797-1851)

ဆင္ျခင္တံု တရားက ရလာတဲ့ ကိုယ္က်င့္ တရားမ်ိဳး မရွိတဲ့ ပုဂၢိဳလ္တစ္ဦး တစ္ေယာက္ကို ကိုယ္က်င့္ တရား ေကာင္းတယ္ လို႔ ေခၚတာဟာ ပ်က္လံုး တစ္ခုပါပဲ။ (ေမရီ ရွဲလီ)


A man's mind is wont to tell him more than seven watchmen sitting in a tower. Rudyard Kipling (1865-1936)

လူ တစ္ေယာက္ရဲ႕စိတ္ ဟာ ကင္းတဲေပၚက ကင္းေစာင့္(၇)ေယာက္ထက္ ပိုၿပီး ကိုယ့္ကိုယ္ကို သတိေပးေလ့ရွိတယ္။ (ရ(ဒ္) ယာ့ဒ္ ကစ္ပ္လင္)
 

Fashion is a form of ugliness so intolerable that we have to alter it every six months. (Oscar Wilde )

ဖက္ရွင္ ဆိုတာ ေျခာက္လ တစ္ႀကိမ္ေျပာင္းလဲေနရေလာက္ေအာင္ကို သည္းမခံႏိုင္စရာေကာင္းတဲ့ အက်ီးတန္ ပံုစံ တစ္မ်ိဳးပဲ။ (ေအာ္စကာ၀ိုင္း)
 

I told the doctor I broke my leg in two places. He told me to quit going to those places. (Henny Youngman)

က်ေနာ့္ေျခေထာက္ႏွစ္ေနရာ မွာ က်ိဳးသြားေၾကာင္း ဆရာ၀န္ ကို က်ေနာ္ေျပာျပ လိုက္ တယ္။ ဆရာ၀န္ က ဘာျပန္ေျပာလဲ ဆုိေတာ့ အဲဒီေနရာေတြဆီ ေနာက္မသြားနဲ႔ေတာ့ တဲ့။ (ဟဲနီ ယန္းမန္း)

Selfishness must always be forgiven you know, because there is no hope of a cure. Jane Austen (1775-1817)


အတၱဆန္မႈ ဆိုတာ အၿမဲတေစ ခြင့္လႊတ္ရမည့္ အရာပဲ၊ ဘာ့ေၾကာင့္လဲ ဆိုေတာ့ ကုရာနတိၳ ေဆးမရွိဘူးေလ။ (ဂ်ိန္းေအာ္စတင္)
 

One of the darkest evils of our world is surely the unteachable wildness of the Good. H.G. Wells (1866-1946)

ကြ်န္ေတာ္တို႔ ကမၻာေလာကထဲ ရွိ အမိုက္ေမွာင္ဆံုး မေကာင္းမႈေတြ အနက္ တစ္ခု ကေတာ့ လူေကာင္း လူေတာ္ ဆိုသူေတြ ရဲ႕ သင္ၾကားလို႔ မရတဲ႔ ရုိင္းစိုင္းမႈ ပဲ။ (အိပ္ခ်္၊ ဂ်ီ၊ ၀ဲလ္)
 

Never give up, for that is just the place and time that the tide will turn. Harriet Beecher Stowe (1811-1896)


ဘယ္ေတာ့ မွ အားမေလွ်ာ့ နဲ႔၊ ကံၾကမၼာေျပာင္းလဲမႈ ဆိုတာ ကာလေဒသ အေပၚမွာလဲ မူတည္တယ္။ (ဟာရုိက္ဘီခ်ာစတူး)


The words that enlighten the soul are more precious than jewels. Hazrat Inayat Khan

စိတ္ ကို အသိဉာဏ္ ရေစတဲ့ စကားလံုးေတြဟာ ရတနာေတြ ထက္ ပိုတန္ဖိုး ရွိတယ္။ (ဟာ့ဇ္ရတ္ အိုင္နယတ္ ခန္)
  

The truth is the kindest thing we can give folks in the end. Harriet Beecher Stowe (1811-1896)


က်မ တို႔ ေနာက္ဆံုး လူေတြ ကို ေပးႏိုင္တဲ့ အၾကင္နာဆံုး အရာကေတာ့ သစၥာတရား ပါပဲ။ (ဟာရုိက္ ဘီခ်ာစတူး)
 

Malice is of the boomerang character, and is apt to turn upon the projector. William Makepeace Thackeray (1811-1863)


ရန္ညႈိး ဆိုတာ လက္နက္ပ်ံ တစ္ခုလိုပဲ၊ ပစ္တဲ့ ကာယကံရွင္ ဆီ ျပန္လည္လာတတ္ တဲ့ သေဘာ ရွိတယ္။ (၀ီလီယံမိတ္ခ္ပီးစ္သက္ခေရး)
 

Better to be without logic than without feeling. Charlotte Bronte (1816-1855)


ခံစားခ်က္ မရွိျခင္းထက္ ယုတိၱ မရွိျခင္းက ပိုေကာင္းပါေသးတယ္။ (ရွားလက္တ္ ဘရြန္႔တီ)


Fortitude is the marshal of thought, the armor of the will, and the fort of reason. Francis Bacon (1561-1626)


သတိၱ ဆိုတာ ေတြးေတာ ႀကံစည္မႈ ရဲ႕ အႀကီး အခ်ဳပ္၊ စိတ္ ဆႏၵ ရဲ႕ ခ်ပ္၀တ္ မိန္ညိဳ၊ ဆင္ျခင္ဉာဏ္ ရဲ႕ ခံတပ္ ပါပဲ။ (ဖရန္႔ဆစ္စ္ ေဘကြန္)


Faith, as well intentioned as it may be, must be built on facts, not fiction- faith in fiction is a damnable false hope. (Thomas Alva Edison)


ယုံၾကည္မႈ ကို ရည္ရြယ္ရင္း အတုိင္း အခ်က္ အလက္ေတြေပၚမွာပဲ တည္ေဆာက ရမယ္။ လုပ္ယူလို ႔မရဘူး။ လုပ္ယူ ထားတဲ့ ယုံၾကည္မႈ ဟာ အမွားျဖစ္ဖို႔ နီးစပ္တယ္။ (ေထာမတ္စ္ အယ္လ္ဗာ အဲဒိဆန္)


Thou shouldst eat to live; not live to eat. Socrates


အသက္ရွင္ဖို႔ စားတာ  မ်ိဳးပဲ ျဖစ္သင့္တယ္။ စားဖို႔ အသက္ရွင္ေနတာမ်ိဳး မျဖစ္သင့္ဘူး။ (ေဆာ့ခရတိၱ)


Time flies like an arrow. Fruit flies like a banana. Groucho Marx
ု့

အခ်ိန္ဟာ မွ်ားတစ္စင္း ပစ္လႊတ္ လိုက္ သလို အကုန္ျမန္တယ္။ စည္းစိမ္ ဆိုတာ ငွက္ေပ်ာသီး တစ္လံုး စားလိုက္သလို အျပဳန္းျမန္တယ္။ (ဂေရာင္ခ်ိဳ မာ့ခ္စ္)


Credit to >>> http://layietcho.blogspot.com/2016/02/blog-post_62.html#more

Related Posts Plugin for WordPress, Blogger...